Thursday, October 27, 2011

27 Oct 11 (Wed) - Strawberry Ice Cream with Chocolate Chips (Part 2)

Took out the ice cream this morning to check and they were solid. Tasted a little and it was yummy but still a bit icy. Took the smaller box to work and was expecting it to melt by the time I reached office. Surprisingly it didn't turn to liquid so quickly put it into the freezer. Got my usual group of tasters to test the ice cream and these were the feedback I got.

EL said she couldn't really taste the strawberries, just a bit sourish.

KC commented that the texture was more like sherbet than ice cream.

Other tasters such as NLK, TYY and GL commented that it was yummy, creamy, not too sweet and the texture was smooth and good given that it was hand-churned.

Got home, tried to scoop the ice cream into the plastic cup to take photo but the shape of the ice cream wasn't quite round coz I didn't have an ice cream scoop to do the job and also the ice cream was really melting fast. Oh well... Like the blogger of The Little Teochew said "Yeah, the things we do for our blogs!"

Hand-churned Strawberry Ice Cream with Chocolate Chips

Thought about the reasons why my ice cream was still icy and I could think of a couple:

1.  I didn't whisk enough
2.  My estimations of the ingredients used were off

Chanced upon this blog called "Ice Cream @ Home" and one of the posts was title "How do I reduce the iciness of hand churned ice cream?". Read it and figured that perhaps what the blogger has written could be the solution to my problem. My freezer could be too cold such that the mixture crystallised too fast and I should have churned the mixture at shorter intervals. Oh well... now I know.

Wednesday, October 26, 2011

26 Oct 11 (Wed) - Strawberry Ice Cream with Chocolate Chips (Part 1)

Have been looking at many other local food blogs for recipes to try lately and started to notice how simple my blog was. So decided to do something about it and started adding pages such as "About", "Travel" and "Recipes". It was through the setting up of the Recipe Index page that I realised that I haven't been giving enough credits to the bloggers whom I took the recipes from. So tried to make an effort to edit some of the posts to link back to the original recipes but sad to say I wasn't 100% successful in that sense. Nevertheless, I made a promise to myself to be mindful in linking back to the original recipes in other blogs.

Ok, enough of my babbling and back to what I'm supposed to write. Saw this mango ice cream recipe in The Little Teochew some time back and had been wanting to give it a try coz I wanted to finish up my icing sugar. Wanted to be a little bit original and so instead of using mangoes, I brainstormed on what other fruits I could use. Considered canned peaches, banana, lychee and finally decided on strawberries. Firstly, I thought it may produce a nice pink color to the ice cream; secondly, in the event I could not find whipping cream, I could at least use it to make strawberry sorbet which is a variation to the raspberry sorbet by The Little Teochew.

Then I thought about how to present the ice cream in the photoshoot and decided that perhaps I could serve it in a martini glass with a bit of crushed nuts on top and one or two chocolate porky sticks. So went to Tanjong Pagar NTUC yesterday during lunch intending to get the strawberries, martini glass and whipping cream. I saw pure cream but not whipping cream and dare not buy it in case they are not the same thing. I also couldn't find the glass and strawberries in the NTUC. Therefore, I went to the market to try my luck and managed to get a punnet of strawberries weighing 454g that cost $7 from one of the fruit stalls.


Strawberries...


... are big and red.

Asked my colleague if she knows the difference between pure cream, whipped cream and whipping cream and she said she thought whipped cream and whipping cream were the same. In other words, whipped cream is a result of whipping cream being whipped. Then she went on to tell me that whipped cream is moose like and usually in can. So I was pretty sure that whipped cream and whipping cream are two different things. Went on to google about it and many people also said they are two different things. After establishing the fact that they are not the same, the next thing was to find out where in Singapore I could find whipping cream. Again googled for the information and found out that NTUC actually carries a brand called Emborg.

So after work, I went to the NTUC in Bukit Merah Central which is a bigger branch to look for the whipping cream and martini glass. Found the former and bought two 200ml tetra packs at $3.40 each but not the latter. I was tempted to get the glass for ice cream but in the end I didn't coz it didn't look very nice and I recalled that I have some plastic jelly cups with legs that I could use in the photoshoot. Also grabbed a packet of meji chocolate sticks before queuing for payment.

Got home, took some photos of the nice, big, red strawberries before washing them. Then dried them using the kitchen towels before cutting them into halves and sprinkled some sugar on them. Left them to stand for a couple of hours till the sugar dissolved before putting them into the freezer to freeze overnight. The reason I froze the strawberries overnight was that my food processor is made to process dry food and so in order to use it on the strawberries, I thought freezing them would solve my problem.


Strawberries cut into halves...

... and sprinkled with sugar.

Woke up to the bright sunshine, ate breakfast and started off with ice cream making. Took the food processor out, measured two cups of frozen strawberries, let them stood for a while before blitzing them to puree. The end product was something between strawberry smoothie and strawberry icy. All the while taking photos and measurements as I work.


The food processor


Chocolate chips and chocolate sticks


Frozen strawberries...

The icing sugar


Whipping cream


... close up.

Then ran the puree through the sieve in order to remove the seeds. This proved to be harder than I thought because the puree was still icy. Had to use the back of the spoon to stir it constantly to make it melt and push it through the sieve which took me about half an hour. So I guess to save the hassle, I should have use a blender (if I have) to make the fresh strawberries into puree before running it through the sieve.


Strawberries puree with seeds

Strawberry puree without seeds

Anyway, after I was done with that, added the icing sugar and the whipping cream. Then started whisking the mixture using a balloon whisk. After about 15 minutes into it, it dawned on me that perhaps I should have used an electric mixer which I don't have. So continued for another 15 minutes and still the mixture didn't have the "soft peak". In the end, I gave up and just poured the mixture into a corning ware casserole and plonk it into the freezer, hoping that it would start to crystallise in 2 hours.

Strawberry puree, icing sugar and whipping cream mixture

After two hours, took the container out and saw that there were ice crystals at the sides but the centre was still liquid. So churned using the balloon whisk and put it back into the freezer again. Well... I guessed if it didn't turn out to be ice cream, it would make a darn good strawberry smoothie. After another 2 hours, took the mixture out to churn again, this time there were more ice crystals forming. Put it back in and after another 2 hours, repeated the process. In total, I churned the mixture for three times at 2 hours interval.

Took the mixture out to check after about 12 hours since the first time I put the mixture into the fridge and the texture was like soft serve ice cream. A thought struck that maybe I shouldn't put the mixture in a corning ware casserole and so transferred the mixture into one of those rectangular takeaway boxes, scooped some into another squarish takeaway box to bring to the office the next day and left everything in the freezer overnight.

Ingredients:
1 tbsp sugar
160g icing sugar
370g strawberries
400ml whipping cream
handful of chocolate chips

Method:
1.  Wash, drain and dry strawberries before cutting into halves
2.  Line them on a plate and sprinkle 1 tablespoon of sugar over them
3.  Let them stand till sugar dissolves and put them in the freezer overnight
4.  Take the frozen strawberries out and let them stand for about 10 mins
5.  Blitz the frozen strawberries using a food processor
5.  Run the strawberry puree through a wire mesh to remove seeds
6.  Add icing sugar and whipping cream to the seedless puree
7.  Whisk the mixture till they are well combined
8.  Pour the mixture into a container of your choice and put into the freezer
9.  Take out after 2 hours to churn using a spoon and repeat this step for another 3 times
10.  Leave the mixture in the freezer overnight for it to firm

Sunday, October 23, 2011

23 Oct 11 (Sun) - Yam Paste with Gingko Nuts [Ou Nee] (芋泥与白果)

Was feeling frustrated about work for the past one week and so wanted to get some cooking therapy done while at my sis’s place. At first I wanted to do baking since I have some mini chocolate chips, icing sugar and butter left. However, I recalled that the self-rising flour, electric mixer, measuring spoons, weighing scale and so on were returned to my BIL’s sister.

So gave up the idea of baking and instead planned to do a no-bake dessert. Came across an ou nee recipe on The Little Teochew food blog, recalled my previous failed attempt and hence decided to give it another try. Messaged my sis on Friday night to ask her to help me get yam during her weekly grocery shopping trip to Giant. Packed some shallots from home and left for her place yesterday late afternoon.

Woke up close to 9am and my sis was already busy cooking in the kitchen. She was preparing the ingredients to cook fried rice using the leftover rice from the night before as my lunch on Monday. Always feel very happy whenever my sis cooks lunch for me to pack to work on Mondays. And I always told my colleagues proudly that the lunch was cooked by my sis. Helped her in the kitchen such as washing and drying the dishes. After she was done cooking, we chatted in the living room till about 10+am before I started working on the yam she bought. It was Thai yam and weighed about 760g.

Thai Yam

Washed, cut, peeled, sliced, diced and finally managed to get the whole yam into bits and pieces. Put them into the steam oven and steamed for about 40 minutes before taking them out to mash. Compared to my previous attempt, the yam looked normal this time (i.e. purplish instead of greenish). Most of the pieces were already very soft, only some bits were still hard. I guessed it was because those were the most outer layer of the yam so would be hard to soften no matter how long the steaming took.

Thai Yam after peeling, slicing and dicing

Anyway, after mashing, measured about one cup of sugar and poured it over the mashed yam. Then combined them using a spatula and set aside. Went on to slice the shallots and then fried them in about half cup of oil over medium heat till they turned brown. Then scooped the fried shallots out of the oil, poured in the sweetened mashed yam and combined them over medium heat till all the oil was soaked into the yam paste.

Told my sis that ou nee was ready and she immediately scooped a ping-pong ball size of it to eat. In the end, she almost scalded her tongue by the hot ou nee. But both of us agreed that it tasted best when eaten fresh and hot from the frying pan. Transferred the ou nee into a bowl and left it together with the small bowl of fried shallots on the dining table to cool.

My younger niece needs to go to Beijing mid next month for her track & field training and so my BIL was looking for the winter clothing for her. He asked my sis where she put all the winter clothing and when my sis came out of the shower room, my BIL complained about a foul smell. Turned out that the foul smell was a result of my sis eating the fried shallots. It was really funny at that moment.

Then my BIL’s sis came over to borrow some stuff, told her that the ou nee was ready and she said she has some sweetened gingko nuts to go with it. Took some photos of the ou nee with fried shallots and gingko nuts before eating. My sis said the ou nee was nice while her SIL said it was sweet enough even though there were still some hard bits of yam in the paste. I thought my BIL and his family would be eating the ou nee but my sis told me that the rest actually don’t eat ou nee despite the fact that they are Teochew. So packed the rest to bring to work the next day.

Yam Paste with Fried Shallots
Yam Paste with Gingko Nuts

Ingredients (Serves 10):
760g Thai yam, peeled, sliced and diced
1 cup sugar
1/2 cup oil
4 shallots, sliced

Method:
1.  Steam yam slices for about 40 mins till soft
2.  Mash steamed yam using a spatula
3.  Pour sugar into the mashed yam and fold in using the spatula
4.  Heat up the oil to fry the shallots till they turn brown
5.  Separate the fried shallots from the oil
6.  Add the mashed yam into the oil and start stirring with the spatula till it absorbs all the oil and forms a smooth paste
7.  Garnish the yam paste with gingko nuts or fried shallots

---------------- Edited on 24 Oct 2011 ----------------

In general, my colleagues all commented that the ou nee was nice and not too sweet. However, it was slightly on the dry side. Explained that it could be due to the fact that it was left overnight and also reheated using the microwave oven. Overall, I was simply delighted that my second attempt turned out a OK.

Saturday, October 15, 2011

15 Oct 11 (Sat) - Red Ruby Dessert [Thap Thim Krawp] (红宝石甜品) and Steamed Fish Paste Egg Rolls

It was already two weeks since my last visit to my sis’s place so decided to go visit over the weekend and also to settle the itinerary for the upcoming trip to Australia with my BIL. Recalled that my BIL’s sister mentioned that she has tapioca flour and so planned to cook the red ruby dessert (a recipe that I found in InSing.com) as well as try out the steamed fish paste egg rolls recipe that I saw from a food blog some time ago. Apparently, red ruby dessert is also known as "Mock Pomegranate Seeds in Coconut Syrup", "Thap Thim Krawp" and "Tub Tim Krob". Anyway, messaged my sis last Thursday to tell her my plan and she volunteered to get the ingredients such as water chestnuts, fish paste and thick coconut milk from NTUC in Tampines Mall the next day.

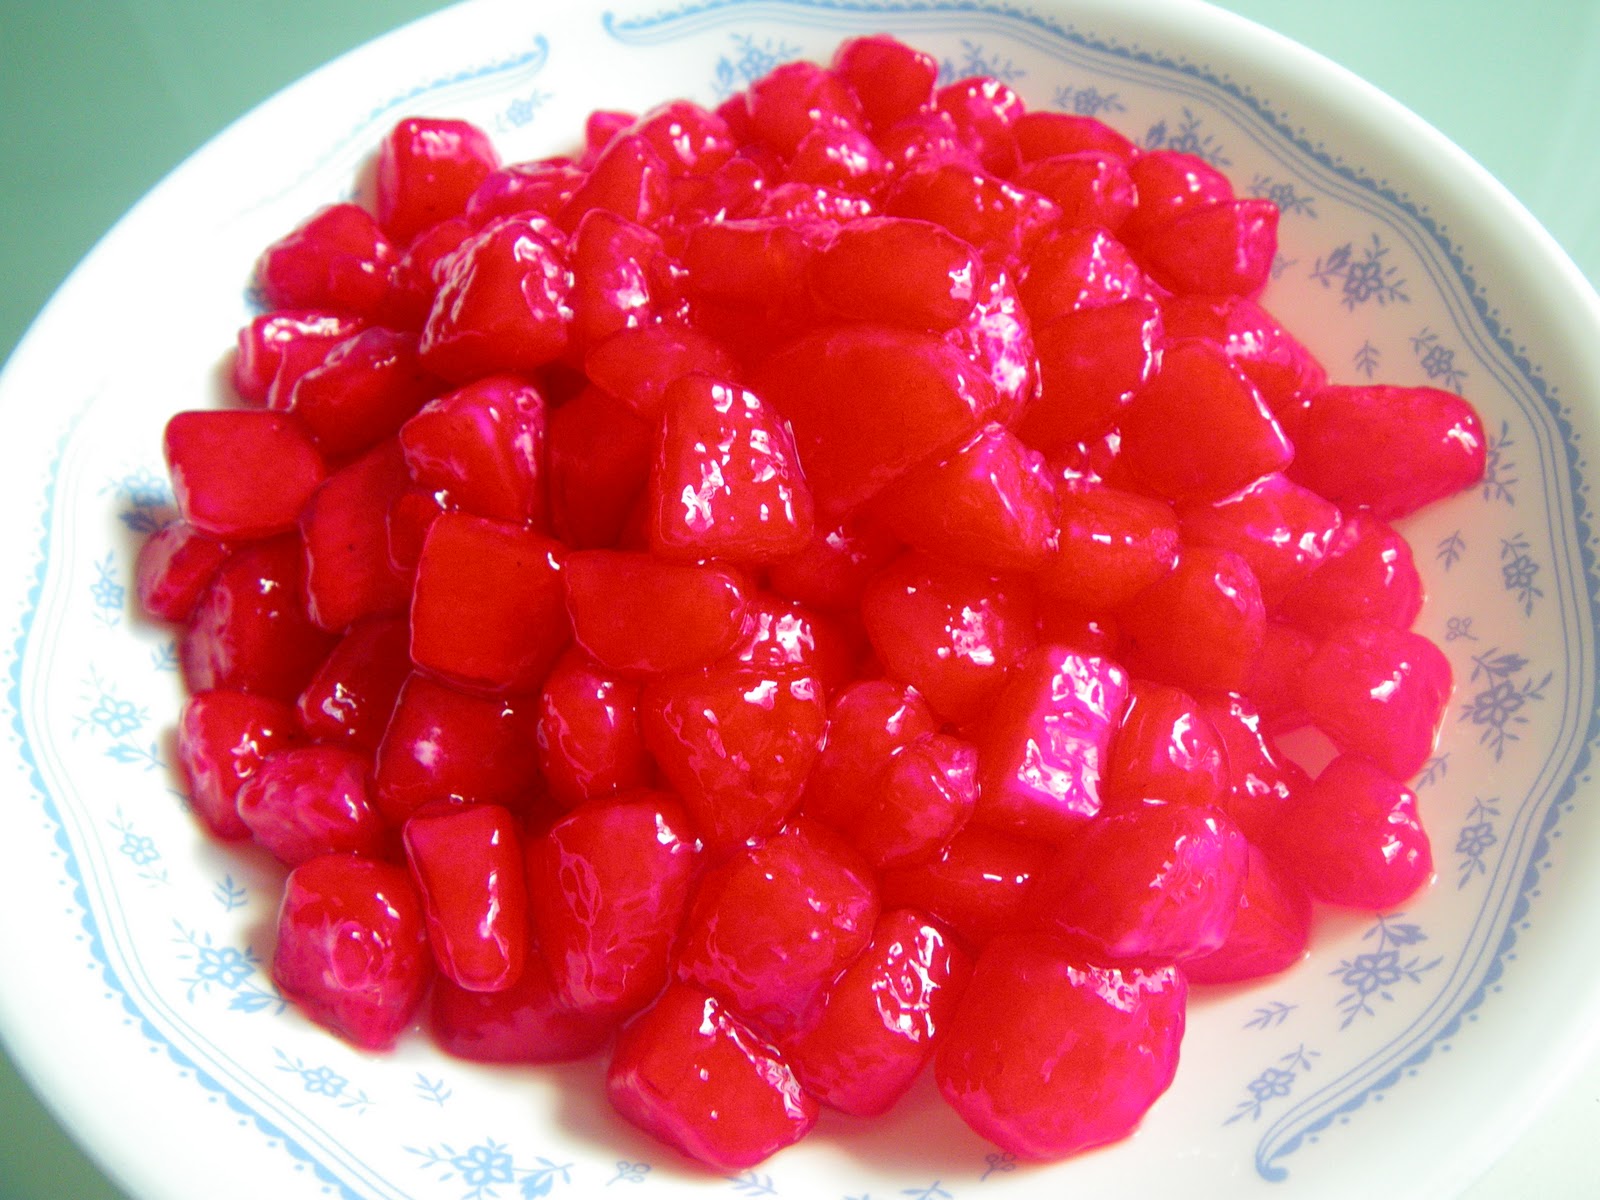
Woke up at 8am today, ate breakfast and then started cooking after my sis and BIL went out for their usual weekly grocery shopping. The last round I used grounded pearl sago as tapioca flour and the result wasn’t good coz they didn’t stick to the water chestnuts properly and after cooking, the coatings came off for some of them. Also for the last round, I used about 10 to 12 pieces of water chestnuts and it wasn’t enough to go around so this time I used about 24 pieces of water chestnuts.

Peeled and cut the water chestnuts to small cubes ranging from 0.5cm to 1cm. Then dyed them with about 1.5 teaspoon of red food coloring to make them redder than the previous round before coating them with tapioca flour. Noticed that water chestnuts were more well coated this time coz of the fine tapioca flour used. After cooking them in boiling water and cooling them down, the coating didn’t come off like the last round.

Since I still have some tapioca flour left from the coating, I poured them into the boiling water and let it cooked till transparent before taking it out to cool. Went on to make the sugar syrup, added in the thick coconut milk, cooled the mixture and distributed them into eight plastic takeaway containers. Then added the red rubies into each container and added the cooked tapioca flour into my portion before chilling everything in the fridge.

Compared to the last round, today’s attempt was much more successful than the previous round. The color was much redder, the coatings were thicker and didn’t come off. Maybe one thing to improve on was to leave the red rubies in the ice water till they are ready to be added into the coconut milk mixture to prevent them from sticking together.


Uncook coated water chestnuts


Cooked water chestnuts

Red ruby dessert

Ingredients (Serves 8):
1.35l water
150g sugar
1/2 tsp salt
300ml thick coconut milk
100g tapioca flour
1.5 tsp red food coloring
24 pcs water chestnuts, peeled and cut into 0.5cm to 1cm cubes

Method:
1.  Put water chestnuts in a bowl, add red food coloring and mix until they are evenly dyed
2.  Put tapioca flour into a clean plastic bag, add dyed water chestnuts and seal bag by twisting near the top
3.  Shake bag until water chestnuts are evenly coated with flour.
4.  Remove water chestnuts from bag and shake off excess flour
5.  Boil water in a large pot, add water chestnuts and return to boil
6.  Remove water chestnuts with a slotted spoon as soon as they float to the surface and transfer them to a bowl of tap water
7.  After about 5mins, transfer the cooled water chestnuts to a bowl of ice water and set aside
8.  Put water, sugar and salt into a large pot. Bring to boil and simmer until sugar is dissolved
9.  Add thick coconut milk and return to boil
10.  Remove from heat, allow to cool thoroughly before adding in the water chestnuts and refrigerate until chilled

Later the evening, I cooked the steamed fish paste egg rolls while my sis cooked curry chicken, cabbage meatballs soup and steamed prawns. Couldn’t remember which food blog I saw the recipe from and so googled for it and found out that actually this recipe was widely experimented. Therefore, I combined some of the ingredients and steps from a few well-known food blogs such as Food 4 Tots, The Little Teochew, Chubby Hubby and My Kitchen Snippets to create my version. So happened that my colleague gave me a packet of seaweed yesterday and so made one with seaweed and one without since some of the people doesn’t like seaweed. The end results wasn’t too bad and I prefer the one with seaweed while most of them opted for the no-seaweed version.

It was a pity that the main dish for the evening was curry chicken and hence my younger niece and nephew’s attention were on that. My BIL commented that the steamed fish paste egg rolls were nice while his sister said the fish paste was a bit too salty. Well… I guess it couldn't be helped since it was ready-made kind from NTUC. If I had managed to get the fish paste from the wet market, perhaps I could have been able to control the saltiness.


Steamed fish paste egg rolls - Outside view


Steamed fish paste egg rolls - Inside view

Ingredients:
2 eggs
1 sheet of seaweed
200g bobo brand fish paste
handful of carrot, chopped
1/2 tsp sesame oil

Seasonings for eggs:
dash of pepper and salt
1/2 tsp mirin

Methods:
1.  Stir in carrot and sesame oil into the fish paste
2.  Add pepper, salt and mirin into the eggs and beat lightly
3.  Heat up oil, pour half of the egg mixture into the frying pan and fry on one side to make one large, round and flat omelet
4.  Repeat step 3 for the second omelet
5.  Lay the omelets on a chopping board, line one with seaweed
6.  Spread evenly half of the fish paste on each of the omelet and roll them up into a tight roll
7.  Place the rolls seam-side down on a plate and steam for about 15-20 mins with high heat
8.  Slice the rolls into 0.5cm slices and serve warm

---------------- Edited on 16 Oct 2011 ----------------

The red rubies tasted better after soaking in the coconut milk mixture overnight coz the coatings expanded hence bigger rubies and the coconut flavor was infused into the rubies.