Sunday, July 28, 2013

28 Jul 13 (Sun) - Pumpkin Mochi Cake and Sitr-fried Beef with Ginger & Spring Onion

Had leftover pumpkin so made mochi cake using the purple sweet potato mochi cake recipe. Steps are about the same, just that there was no need to add water since pumpkin retains water well after boiling. Pumpkin mochi cakes looked better because of the nice golden color.


Ingredients (Makes 12)
160g Pumpkin, cut into chunks
60g Sugar to taste
80g Glutinous rice flour

Method:
1.  Boil pumpkin till tender, off the heat, drain and remove the skin
2.  Add sugar to the warm pumpkin and mash to make into puree
3.  Add glutinous rice flour bit by bit to the sweet pumpkin mixture and mix well to get a non-stick dough
4.  Divide the dough into twelve portions
5.  Roll each potion into a ball and press each one with the base of a cup to form a flat disc
6.  Spread some black sesame seeds on top of each disc
7.  Heat some oil and pan fried both sides of the disc till brown slightly over medium-low heat
8.  Check that the center of the disc is not raw then remove from heat
9.  Best serve immediately or warm


Also since I had leftover beef from yesterday, attempted the stir-fried beef with ginger and spring onion recipe by NoobCook. All went well except that I forgot to add Chinese wine at the end of the cooking. The result doesn't look like the picture in the NoobCook website. Wonder if I had added too much dark soy sauce.

Saturday, July 27, 2013

27 Jul 13 (Sat) - Chilled (Purple) Sweet Potato in Pumpkin Soup

Bought the Japanese pumpkin yesterday and with the leftover purple sweet potato from last week, I finally got to re-create the dish I saw from the newspaper couple of weeks ago. I didn't have any recipe so the whole dish is based entirely on my own estimation. Used about 170g of the pumpkin, cut them into chunks and boiled till tender. Then removed the skin, added 4 teaspoons of castor sugar and mashed them with a fork to create a puree.


After that, took one purple sweet potato that weighed about 120g to boil till tender. Peeled off the skin, cut into small pieces, added 4 teaspoons of castor sugar and mashed with a fork. Prepared a pipping bag with a with a star-tip nozzle. Added milk to the mashed sweet potato to create a smooth consistency that is suitable for piping. Filled the piping bag with the smooth paste and pipe on a serving plate a simple swirl by creating a circle and squeeze out the paste while slowly twisting the wrist clockwise, coming into the centre to finish off. Repeated the piping process with smaller circles till I got a small cone shape. Ok, I got to admit, I don't have good piping skills.

Added milk to the pumpkin puree to make it more watery and then poured it at the base of the sweet potato. The setup looked nice because of the contrast in color. Taste-wise, the chilled pumpkin soup was actually quite refreshing and complimented the rather filling sweet potato.


Some things to note:
  • Make sure the mashed sweet potato is completely mashed with no small bits left. Using a food processor or a blender will be good. This is because those small bits will block the opening of the nozzle and making it impossible to pipe properly.
  • Using a blender to blend the milk and the pumpkin puree will give a smoother consistency

After all the hard work, went on to cook my favourite beef noodle as a reward (lunch) to myself. Lol.

Sunday, July 21, 2013

21 Jul 13 (Sun) - Purple Sweet Potato Mochi Cake

Found a pack of Vietnamese coffee in the pantry and bought a can of condense milk while doing marketing this morning. Started the day with a nice cuppa before diving into the next session of cooking therapy.


Had some leftover seafood from yesterday and so did a simple pan-fry to the white fish and scallops as well as quick boil to the prawns and vegetables.


Managed to get some purple sweet potatoes from Cold Storage, Vivo City, last Friday but I forgot to get the Japanese pumpkin. So instead of trying to do that dish I saw on the newspaper few days ago, I used them to do the pan-fried mochi cake instead. The look of the cakes wasn't very nice because of the color after pan-frying. Perhaps next time can create a marble effect by adding pumpkin-flavored dough? Hee...


Ingredients (Makes 12)
160g Purple sweet potatoes
60g Sugar to taste
70g Glutinous rice flour
Water

Method:
1.  Boil sweet potatoes till tender, off the heat and retain the water
2.  Remove the skin of the sweet potatoes and cut into small pieces
3.  Add sugar to the warm sweet potatoes and mash
4.  Add glutinous rice flour bit by bit to the sweet potato mixture and mix well
5.  Add warm water to the mixture if it is too dry to get a non-stick dough
6.  Divide the dough into twelve portions
7.  Roll each potion into a ball and press each one with the base of a cup to form a flat disc
8.  Spread some black sesame seeds on top of each disc
9.  Heat some oil and pan fried both sides of the disc till brown slightly over medium-low heat
10.  Check that the center of the disc is not raw then remove from heat
11.  Best serve immediately or warm

---------------- Edited on 22 Jul 2013 ----------------

Woke up earlier than usual this morning to heat up five mochi cakes using frying pan to bring to office. By the time I got to office, the cakes were already lukewarm. Messaged to SWT and asked her if she wanted to try and she came over to my cubicle. I was rather surprised that she asked for second helping. The feedback she gave was that the taste of the black sesame seeds overpowered the taste of the sweet potato. It was unless towards the end that she could taste the sweet potato.

Offered one to TYY and she said it was nice and the texture is similar to those sweet potato balls sold by one of the stalls in Maxwell Food Center. Offered one to NYP and another two KH and they both said nice. KH commented that it was a bit small such that he finished the cake in one mouth. So he suggested that perhaps next time I could make them bigger.

Recipe submitted to Munch Ministry

Saturday, July 20, 2013

20 Jul 13 (Sat) - Seafood Paella

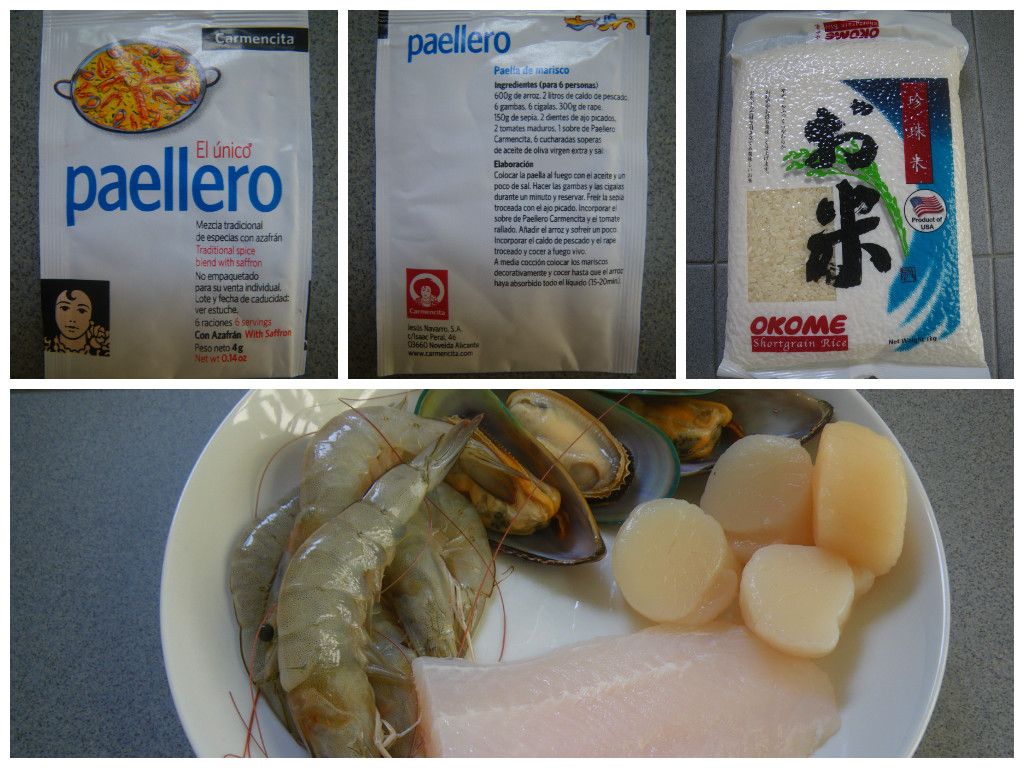
Bought a box of five sachets of paella seasoning during my recent trip to Spain and wanted to try cooking paella. I know that the rice used in paella is different from the normal rice and I had the impression that I would be able to find it in Singapore so I didn't buy the Spanish rice when my friend told me to. How wrong I was. Google about the rice used and found out that Spanish rice are not widely available outside of Spain or Europe. So I had to look for substitute. Some websites recommended long-grain rice while some recommended short-grain rice and that got me really confused. Read the descriptions of the various Spanish rice used for paella and realized that they are short-grain rice hence decided to use Japanese short-grain rice which some websites recommended.

On the box of the paella seasoning was some English instructions but they were vague while those on the sachets were detailed but they were in Spanish. Tried to translate them using Google Translate as well as searched for paella recipes online, hoping to make sense of the instructions and modify them according to my needs. Found one which looked really good and wrote down the ingredients needed. Went to Giant to get the rice, prawns, mussels, white fish, scallops, yellow onion and tomatoes after work yesterday and did my cooking today.

As one sachet is enough for six servings, I used only half to cook for three because I didn't have a big paella pan. Then I realized that I forgot to copy the quantity of ingredients needed in the recipe which I remembered was for four to six servings. So I had to use my own estimations for the entire cooking session. Made the seafood broth as required by the recipe using four mussels with shells, shells of six prawns and 750ml of water. While simmering the broth, grated half of the yellow onion, one small tomato, minced two cloves of garlic, cut the fish into thin slices, washed the rest of the prawns, mussels and rice. The instructions on the sachet stated 600g of rice for six servings, so since I’m only using half the portion so I cut the rice down to 300g.


After the broth was done, I started the actual cooking using the Happycall Pan as a paella pan. Heated up the pan, pour in some olive oil, fried the grated onion till soft and brown before adding the tomato pulp, minced garlic and rice. Fried on high heat for a couple of minutes then spread the rice across the pan before adding in the broth. Used 90ml of broth to dissolve the seasoning and added into the pan. Then went on to add another 450ml of the broth into the pan to cover the rice. Brought it to boil before lowering the heat to let it simmer, constantly shifting the pan over the flame to make sure that all sides are cooked.

Didn't keep track of the timing and added the mussels, prawns and fish in that order when the rice was on level with the broth. Didn't manage to add in all the ingredients I had prepared due to the size of my Happycall Pan. As the rice got cooked and the broth reduced, the mussels were cooked; the prawns and fish slices were half cooked. So covered the pan hoping that the trap heat would cook the prawns and fish slices but only prawns got cooked. The fish slices were still slightly raw. So in the end I had to manually flip the fish slices, covered the pan and turned on high heat for a couple of minutes. Finally the fish slices got cooked but the prawns were overcooked and they became hardened. Off the heat, covered the pan and set aside to let it stand as instructed in the recipe. Went on to pan-fry a few scallops and then topped the paella with them.


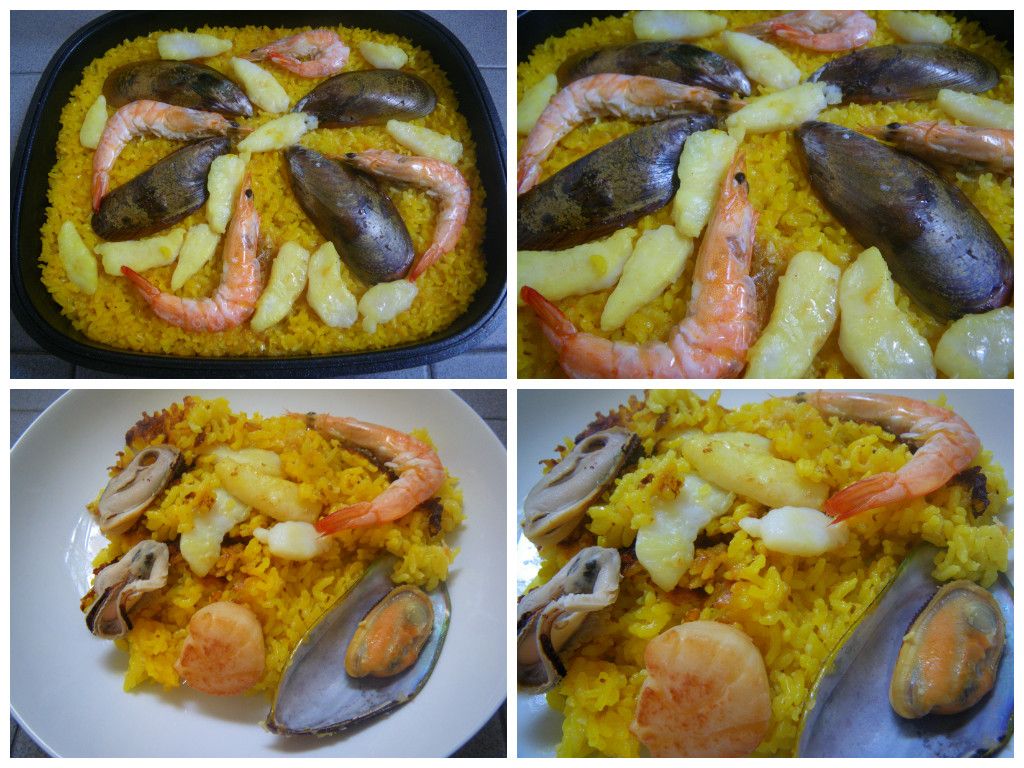
The look of the seafood paella was rather good; however, taste wise it was not fantastic. It was a little too bland, rice was a bit too soft and prawns overcooked. My guess was that firstly, the seafood broth wasn't tasty enough, meaning I didn't use enough prawn shells and mussels to cook the broth. Secondly, maybe I had used too much rice and the tasteless broth so ended up with diluted seasoning. Thirdly, the timing of putting in the seafood was not well planned. Oh well… this is after all my first attempt, I shall improve on it with those modifications on my next attempt.

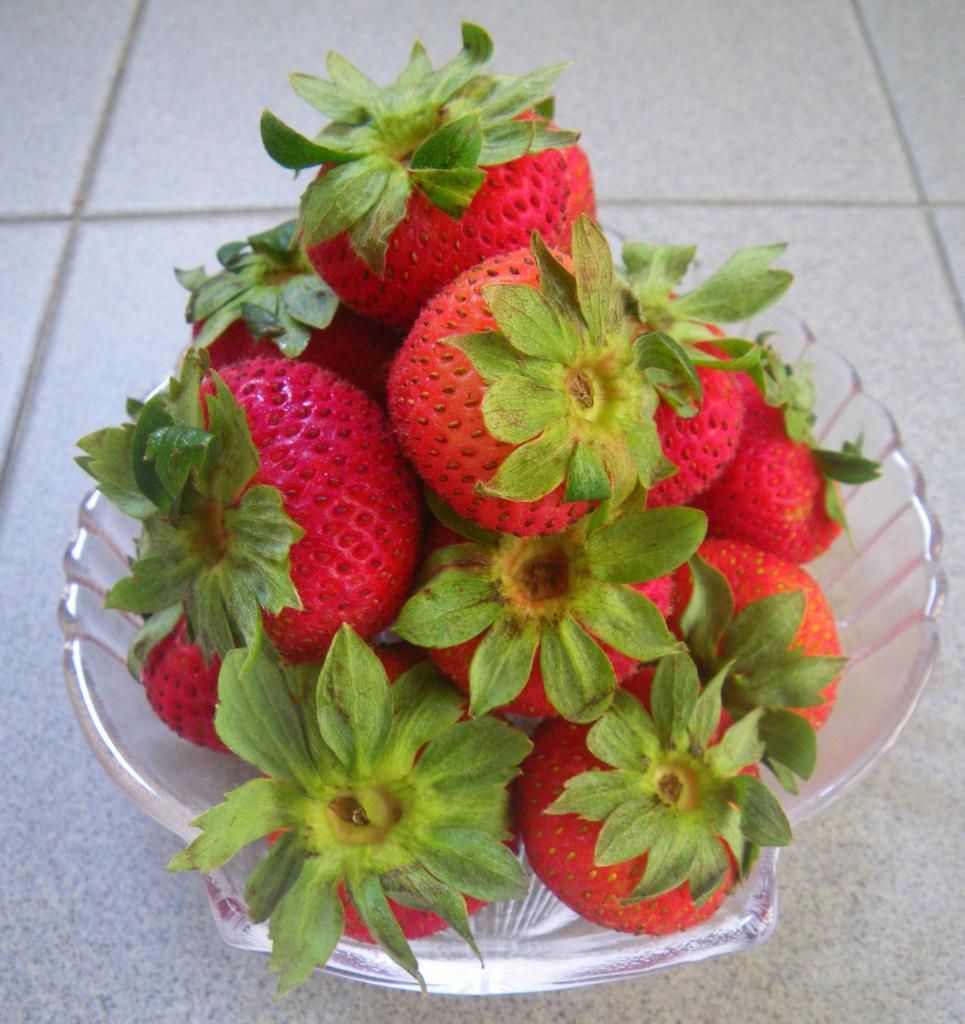
At the end of the cooking and eating, I rewarded myself with loads of summer fruit. Strawberries!

Thursday, July 11, 2013

A Review: Sophie Bakery (Part 2) and Promotion: Matt's The Chocolate Shop

Blog about my review on Sophie Bakery back in April and made a promise to myself to go back again to try their fruit tarts. So I went back to the shop today during lunch. It was not as crowded as it was back in April and there were more macarons this time. However, the variety of the bread and tarts seem to have shrunk which made me a little disappointed. Nevertheless, I bought a Pineapple & Berries Tart, a Pain au Chocolate for myself and two Strawberry Tarts for a colleague.


The prices of the butter croissant, chocolate croissant, eclair and so on were still the same except for their fruit tarts which went from $4.50 to $4.90. The chocolate croissant was as tasty as the butter croissant but just because of the chocolate filling, it cost $0.50 more. Personally, I feel that I would just go for the butter croissant.

As for the fruit tart, instead of the usual cream or custard filling, this has a crumbly filling and with a hint of almond-flavour, I think. It was good but for the price of $4.90, personally I find it a bit steep. So overall, the food was good but I don't think I will buy again unless I'm feeling pretty rich. However, I don't mind going back for the butter croissant thought.

UPDATE: THE SHOP HAS CLOSED.

========================================================================

Extra! Extra!

Matt's The Chocolate Shop which is nearby is having their 1-year Anniversary Promotion.
  • 12.5% off all Small Chocolate Cakes
  • 15% off all Medium and Large Cakes
  • 20% off if you order their Medium or Large Cakes at least 1 day in advance

Plus, they added Pandan Butter Cake drizzled with Gula Melaka Syrup to their product range recently

Hurry! Promotion ends 31 July 2013.

Sunday, July 7, 2013

7 Jul 13 (Sun) - Cream of Pumpkin, Pan-fried Steak and Sweet Mash Pumpkin

Saw a picture of a dish called “Chilled Cream of Pumpkin with Sweet Potato” by a local chef from a well-known restaurant last Thursday and it looked really nice. It had the purple sweet potato twirled on a plate of yellow cream of pumpkin soup. Was motivated to replicate the dish and so went on to search for recipes online. Found a few recipes on cream of pumpkin and saw one that was really simple to do so copied that down in my notebook. Went on to search for recipes on mashed sweet potato but I did not have time to study them in details therefore settled to try out only the cream of pumpkin this weekend. Went marketing on Friday and bought a small portion of Japanese pumpkin, a piece of top rump and a few other stuff. My plan was to cook beef noodle on Saturday and use the balance to cook stir-fry beef on Sunday as well as to try out the cream of pumpkin on Sunday.

Japanese Pumpkin

Unfortunately, my plan was messed up due to some unforeseen circumstances, hence had to rearrange my meal plans. In the end, I came up with a 3-course meal consisting of Cream of Pumpkin, Pan-fried Steak and Sweet Mash Pumpkin. The second was a change to my original beef noodle and because I did not want to buy a broccoli just to use a small portion of it, I used choy sum instead. And since the cream of pumpkin called for potato as one of the ingredients, boiled the balance to go with the steak. The last dish, which was a dessert, was really something that came up impromptu.


Cream of Pumpkin

Pan-fried Steak

Bought the other ingredients called for in the cream of pumpkin from the market and started cooking after breakfast about 9:30am. I thought I was going to take a long time to finish the cooking but I was done by 11:15am, including washing and photo taking. Whee! Was pretty proud of the cream of pumpkin because that turned out really well even though I modified the recipe a little by sauteing the onion with some olive oil, pre-boiling the pumpkin to separate the flesh from the skin and replacing thick cream with milk. Since I had some boiled pumpkin left, mashed them with a packet of MacDonald’s fine sugar and surprisingly I got a very smooth consistency so used that as my dessert.

Sweet Mash Pumpkin

Overall, the 3-course meal turned out quite well and presentable given that I was improvising with limited resources. Heh…

My 3-course Meal

Cream of Pumpkin (Serves 1-2)
Adapted from Bestrecipes website

Ingredients:
160g Japanese pumpkin, after boiling and skinned
50g potatoes, diced
1/2 medium yellow onion, diced
1/2 chicken stock cube, crumbled
160ml water
40ml milk
Olive oil
Salt

Method:
1.  Sauté onion with some olive oil in a saucepan
2.  Place all other ingredients, except milk and pumpkin, in the saucepan
3.  Simmer until vegetables are tender
4.  Add pumpkin and mash while boiling for another 3 minutes
5.  Remove from heat and add salt to taste
6.  Blend until smooth
7.  Add milk and stir through
8.  Garnish with chopped pistachio nuts

Note: The balance of the boiled pumpkin can be mashed with castor sugar while still hot/warm to be made into a dessert on its own.

Recipe for Cream of Pumpkin submitted to Munch Ministry